
Steinberg has made powerful, flexible, and easy-to-use tools for decades.
We’ve already covered their powerful drum re-synthesis tool Backbone—available as a standalone plan through Splice Rent-to-Own—but they’re most widely known for developing one of the industry’s most beloved DAWs: Cubase.
Cubase is way too deep to cover everything it can do in a single article, so let’s take a look at five unique tools and features that streamline and supercharge your production, mixing, and editing workflows. Remember, you can try Cubase Pro 12 yourself on Splice Rent-to-Own—free for 14 days, then just $16.99/mo until it’s yours.
In this article, we’ll be demonstrating these Cubase tools using a quick, 16-bar funk beat that’s made with a few Splice loops, very minor processing, and Cubase workflows. Here’s how it first sounds with just a songstarter and drum loop:
1. Get more from your samples with Audio to MIDI chords
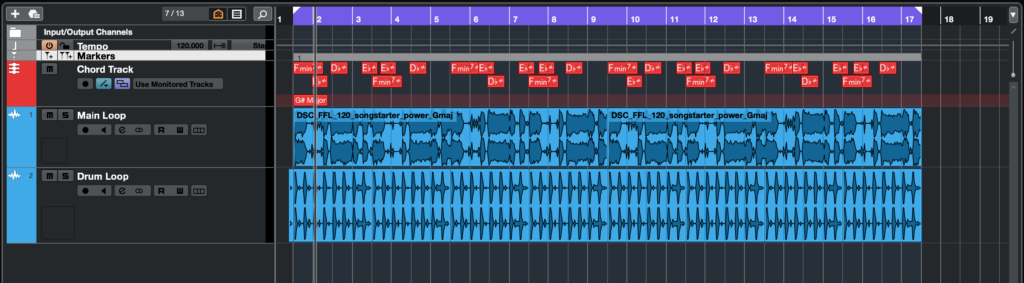
Cubase uses the concept of a Chord Track to dictate chord progressions to other channels. This isn’t only helpful for composition—powered up by the Chord Assistant that can suggest alternative chords for new variation—but it can also be used to make loops more usable.
This loop feels a bit thin in the low-mids, even though the bass underneath is nice. I want to add an organ that’s doubling the chords and only hitting with the chords in the loop, but figuring out and timing the chords would get pretty time-consuming.
Thankfully, we can use Audio to MIDI chords to analyze the chord progression from an audio event. Simply dragging the audio clip to a new Chord Track will do the trick, revealing the chord progression from the loop. This analysis got the chords I wanted, but you can correct the analysis if it got any of them wrong.
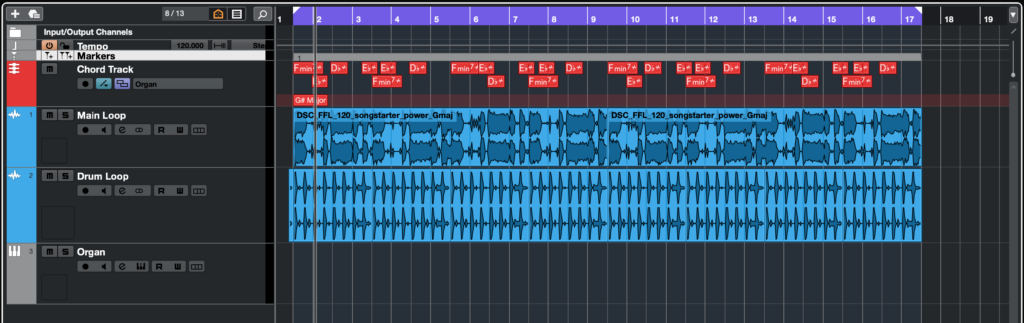
Now, I’ll create a new Instrument channel and load up the Retrologue synth that comes with Cubase, picking and making some tweaks to an organ preset I like. I’ll make sure to set the “Track for Auditioning” in the Chord Track to the Organ channel so the organ will read chords from the Chord Track.
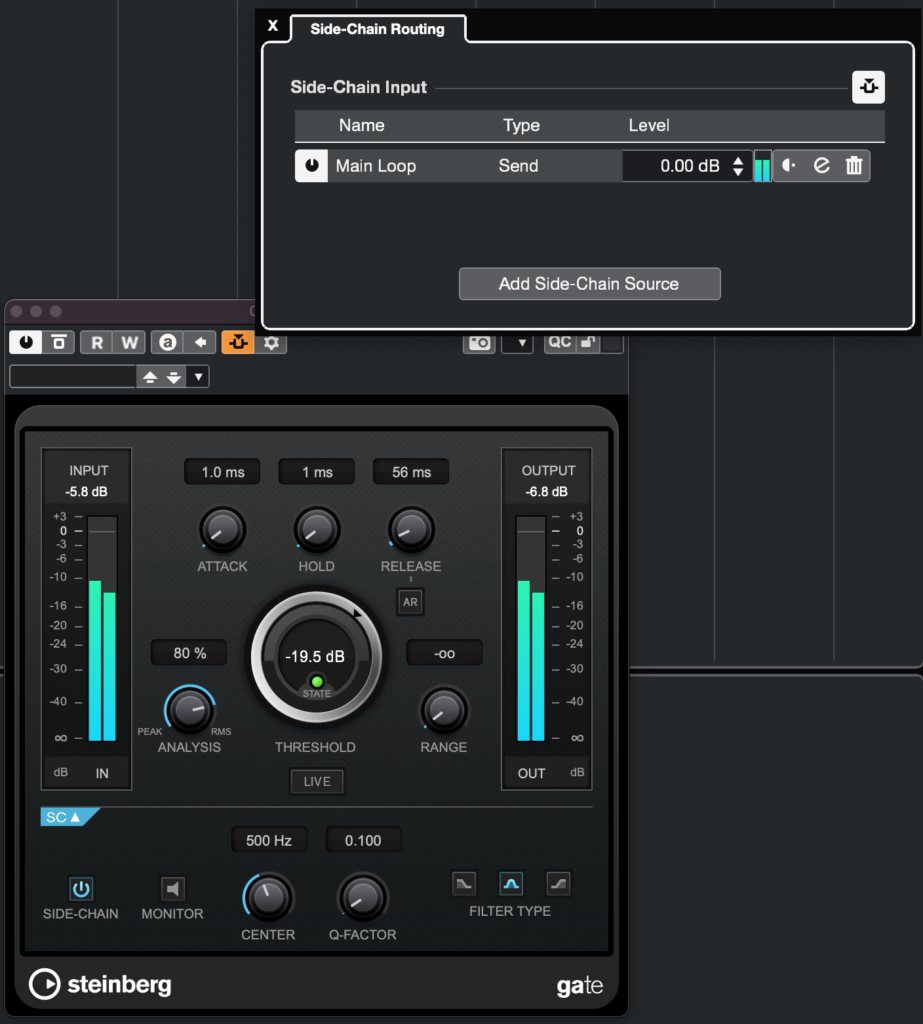
To make sure that the organ hits with the chords in the loop, I’ll gate the organ using the loop as a sidechain input. Loading up the stock Cubase Gate plugin, I’ll activate sidechaining and set my sidechain input as the Main Loop. Activating the SIDE-CHAIN control in the bottom SC panel and dialing the gate in to register according to the loop, the gate now only opens when the big hits in the loop happen, while the organ is automatically playing the analyzed chords underneath.
Now I have a layered organ beneath the chords to beef them up—and I didn’t have to insert a single MIDI note. Here’s the 16-bar loop from before, with the organ layer added for bars 5 – 8 and 13 – 16 (the organ will be a bit louder than necessary in this one so you can really hear how it sits in the chord stack):
2. Make chord progressions easier with Chord Pads
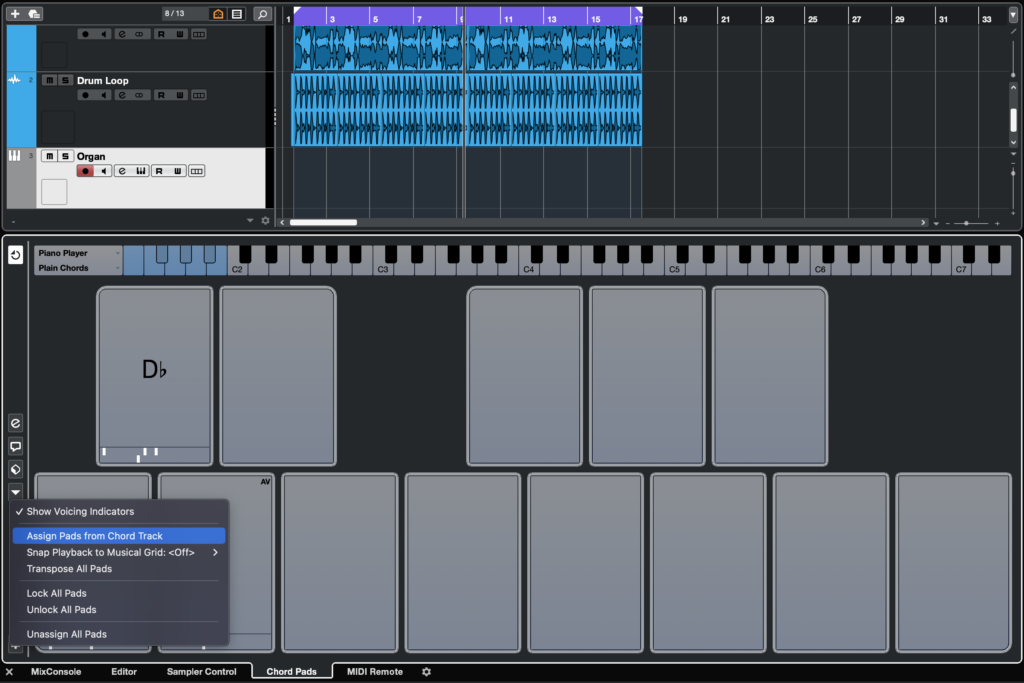
Now that I’ve added this organ layer to the track, I want to change the inversion that these chords are playing. This is super simple with the Chord Pads feature, a tool that lets you trigger full chords using individual pads, which can be mapped to a MIDI controller for easy playing.
On top of setting the chords themselves, the Chord Pads can also specify the tensions (everything from a simple maj7 to jazz-oriented 9th and 11th chords) and the voicings of your chords (i.e. which inversion the chord plays). And very helpfully, each pad will react to the voicing of the previously played pad to ensure smooth voice leading.
Again, I like this new organ layer, but I want it to play a different inversion, and I’m not sure which inversion would sound best just yet. To figure this out, I’ll first open the Chord Pads on this Organ channel, and then use the drop-down menu to pull chords from the Chord Track we set up earlier. I’ll also temporarily disable the Gate from the last step so I can actually hear the organ playing, even though that Main Loop will be muted.
After playing around with some different voicings, I’ve determined that I want the Fmin7 in first inversion, the E♭ chord in 2nd inversion, and the D♭ chord in its root position. But remember, this organ is playing its chords according to the Chord Track at the top of our project.
To change the inversions in our Chord Track, we can simply select any chord event in that channel. In the top Info section, we’ll find a parameter for this chord’s inversion. I could change this setting for each chord event, but I could also enable “Adaptive Voicings” in the Inspector window on the Chord Track and Cubase will automatically voice lead the chords. These inversions follow ‘correct’ voice leading rules, so I’ll just enable Adaptive Voicings.
Here’s our 16-bar loop with the organ playing the right voicings and set a bit further back in the mix (again, organ is only playing for bars 5 – 8 and 13 – 16):
3. Simplify pitch correction with Scale Assistant in VariAudio
This groove is nice, and I’d love to pull a vocal into the project to carry some more energy. I found a great loop on Sounds that fits the vibe I’m looking for, but not only is it in the wrong key, but it’s also got a few passing notes that might be rough with our current progression.
I’m so sorry to do this to your ears, but here’s that vocal sample in our groove without any editing whatsoever:
Yeah, not quite there… But with Cubase’s VariAudio function, we can pretty quickly apply some pitch correction to this vocal, and we can even use the Scale Assistant to make sure that our vocal part stays fully in-sync with these chords.
First, I’ll select my vocal channel and the audio event in question, which includes my entire vocal part. Opening the Editor window, I’ll expand the VariAudio section and activate the “Edit VariAudio” button. This will cause Cubase to analyze my recording for pitches, which can then be manipulated further with the VariAudio engine.
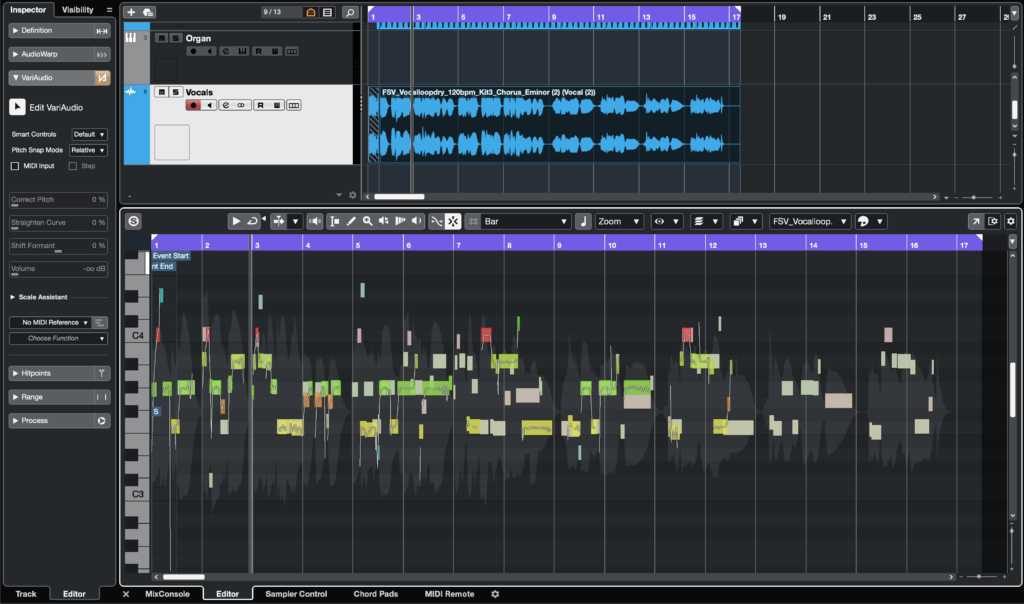
Before going any further, I’m also going to expand the Scale Assistant section and activate “Use Chord Track,” with the mode set to “Chords & Scales” in the drop-down. This way, if any chords in our progression fall outside of the standard F minor scale (which our track is in), the vocal will follow the notes that make sense for our chords. You’ll notice that with “Show Scale Note Guides” turned on, the piano roll shows exactly which pitches will work for our progression.
First, since our vocal is in E minor and the rest of the track is in F minor, I’m going to select all of the notes and move them up a step. Because we’ve got our settings as they are, this is actually going to move our vocal notes diatonically—or within the key of F minor. Here’s how it sounds with just that change:
You’ll probably hear that a few notes—especially in the second half of the phrase—seem a bit flat, and that’s because there are some notes in the original vocal that don’t quite fit into our progression. But with VariAudio, you can very easily edit those notes within Cubase itself. Using VariAudio for pitch correction could be a full tutorial alone, but here’s our new vocal part with those few notes edited, plus some general pitch and pitch-drift correction and some light processing:
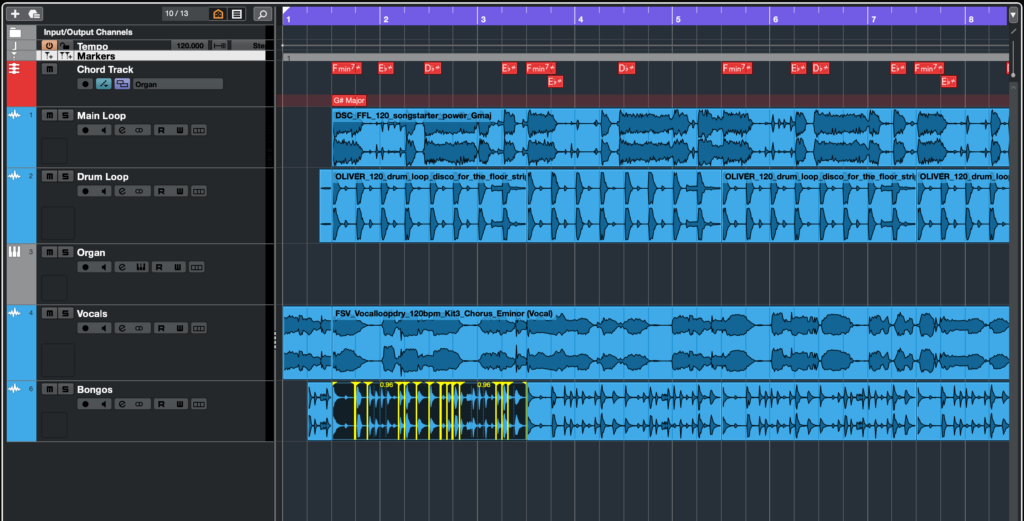
4. Fine-tune your recordings with Free Warp in AudioWarp
I’m a huge fan of the classic disco / funk drum pattern that heavily relies on that four-on-the-floor kick pattern, but it can get pretty repetitive pretty quickly. I want to spice things up with a percussion layer, so I’ve dragged a bongo loop in from Sounds, but I’m noticing that it’s not quite as on-the-grid as I’d like it to be:
Cubase makes timing edits like this a breeze with the Free Warp mode in its AudioWarp engine, allowing you to insert and move warp markers directly from the main project view. First, I’ll just select the audio clip of that bongo loop and activate the Time Warp / Free Warp tool from the top toolbar, setting it to Free Warp mode.
Now, I’ll just go into my bongo clip and create warp markers on transients that stray a bit too far from our grid. By just clicking and dragging, I can get these bongo hits to line up with our groove a bit better and act more as a supporting layer than an expressive percussion layer that’s trying to ‘say its own thing.’
After duplicating this clip a few times, we’ve got an in-time bongo layer for the whole track:
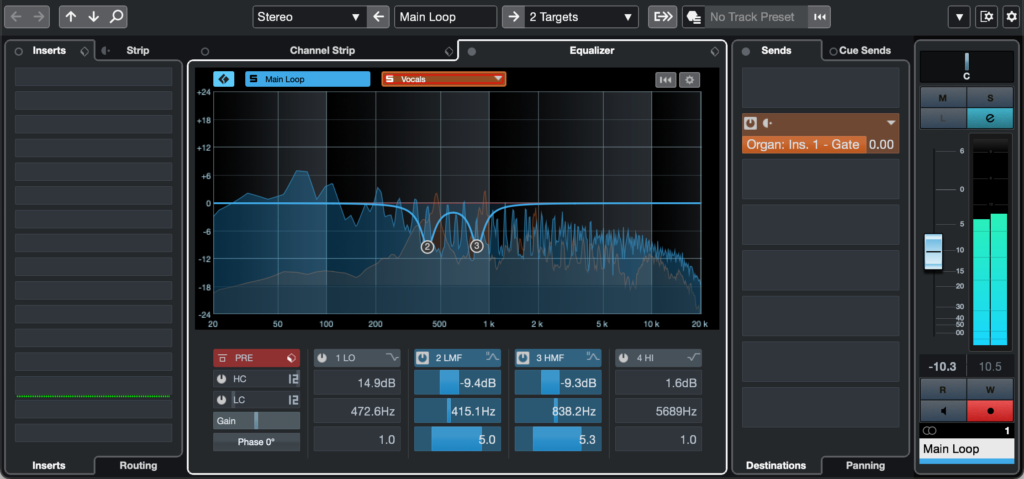
5. Create space in your mix with Spectral Comparison EQ
This project is sounding pretty good so far, but I’m still not loving how much the vocal, main loop, and organ are competing with each other for frequencies. In most DAWs, we could go into the vocal and identify key frequencies, write them down, and then use EQ to attenuate those frequencies in the main loop and organ.
In Cubase, however, we can just use Spectral Comparison EQ to do all of this from one EQ window. First, I’ll open up the on-board EQ in the Main Loop channel by opening its channel settings (using the icon that looks like a lower-case ‘e’) and switching over to the Equalizer section. You’ll notice that there’s a blank drop-down menu near the top of the window; this will allow me to select Vocals Tuned as a comparison channel.
Now, when I hit play, I’ll see the spectra of both the Main Loop and the Vocals simultaneously. Because this is the EQ for the Main Loop channel, any changes we make here will only impact the Main Loop. So, we’ll find the frequency pockets where our vocal is the strongest (this singer has a fundamental frequency around 415 Hz and their first harmonic around 838 Hz) and scoop a bit of these frequencies out of the Main Loop channel to make space. We’ll do the same with our organ and give all that space to the vocal:
What will you make with Cubase?
With a tool as deep as Cubase, there’s really only so much ground that we can cover in a single article. That said, we hope that this article showed how some of the interesting tools and workflows in Cubase can make production, mixing, and more much simpler. But nothing beats trying it out for yourself…
Try Cubase free for 14 days, and then Rent-to-Own it for $16.99/mo until you own it outright:
July 6, 2023


